
Postpartum hemorrhage: Solutions to 2 intractable cases


A stepwise approach to bleeding caused by persistent uterine atony and placental abnormalities
IN THIS ARTICLE
If this procedure does not reduce the hemorrhage substantially, perform a high uterine artery ligation. This technique is identical to the inferior vessel ligation, but is performed approximately 5 cm superior to the first ligation site.
If these steps fail to reduce bleeding significantly, ligate the utero-ovarian blood supply bilaterally in similar fashion.
STEP 4: Place uterine compression sutures
The uterus can be externally compressed by the strategic placement of sutures.
The B-Lynch technique. This method8 begins with placement of a long size 1 chromic suture on a large curved needle through the anterior lateral aspect of the myometrium just below the repaired uterine incision during a cesarean delivery (FIGURE 1). (It is placed in the same anatomic location in the absence of a hysterotomy.) The suture then exits just above the uterine incision.
The suture is directed over the anterior surface of the myometrium, over the fundus, and down the posterior wall of the uterus, before reentering the myometrium at the inferior posterior lateral edge of the uterus and crossing horizontally to the opposite edge. The suture is then brought up over the posterior myometrium, over the fundus, and back across the anterior myometrium. It then reenters the anterior myometrium just above the uterine incision and exits just below it. The 2 free ends are tied together under tension while a surgical assistant manually compresses the uterus.
To determine the degree of blood loss, visually inspect the vagina. If the technique has been successful, close the abdomen and give the patient a uterotonic for 24 hours. Also, monitor urine output, hemoglobin, and hematocrit carefully and inspect the vagina frequently for blood loss.
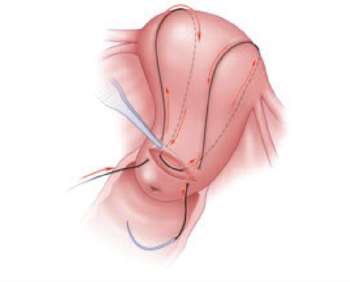
FIGURE 1 Compress the uterus with the B-Lynch technique
Pass long size 1 chromic suture through the anterior uterine wall just below and above the usual site of a low-transverse incision, wrap the suture around the anterior and posterior uterine walls, and pass through the posterior wall opposite the entry point. Wrap the suture again and finish near the entry point on the anterior wall. Tie the ends tightly with the uterus under compression.The square-suture technique, described by Cho and colleagues,9 is also useful (FIGURE 2). It involves placement of size 1 chromic catgut suture using a free, long, straight Keith needle in the following steps:
- Pass the suture through the myometrium, anterior to posterior
- Pass the suture through the myometrium again, posterior to anterior, approximately 4 to 6 cm medial to the exit point of the first pass
- Place the suture 4 to 6 cm inferior and pass it through the myometrium yet again, anterior to posterior
- Pass the suture through the myometrium, posterior to anterior, 4 to 6 cm lateral to the last exit point
- Tie the 2 free ends together under tension while a surgical assistant compresses the uterus in the anterior-to-posterior direction.
Place 3 to 5 of these sutures across the surface of the uterus until the resulting compression relieves the hemorrhage. Before closing the abdomen, inspect the vagina carefully to confirm the success of the procedure.
Both the B-Lynch and square-suture techniques are intended to preserve the patient’s fertility. If the patient has completed childbearing, consider prompt hysterectomy instead.
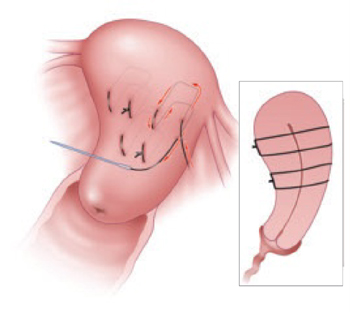
FIGURE 2 Compression option: Square-suture technique
Using size 1 chromic catgut suture on a free, long, straight Keith needle, stitch the anterior and posterior uterine walls together in 3 to 5 small squares. The ends of each square are then tied tightly while an assistant compresses the uterus from anterior to posterior.
STEP 5: Perform hysterectomy
If compression sutures and devascularization of the uterus fail to control the hemorrhage, hysterectomy is the next step.
CASE 2: Attached placenta exacerbates bleeding
A 36-year-old gravida 4 para 3 with 3 prior cesarean deliveries presents at 36 weeks’ gestation with heavy vaginal bleeding. A sonogram performed earlier in the pregnancy revealed an anterior placenta previa. The patient undergoes emergent cesarean delivery for continued brisk bleeding, but the placenta fails to detach from the uterus.
How would you proceed?
STEP 1: Attempt to separate the placenta from the uterus
Gently attempt to manually develop a separation plane between the placenta and uterus. If this proves impossible at all surfaces of the placenta, the accreta is global, and hysterectomy is warranted in most cases.
If placenta accreta or percreta is strongly suspected before delivery, avoid attempts to deliver the placenta and proceed to hysterectomy or planned retention.
STEP 2: Perform hysterectomy or planned retention
If a separation plane can be developed between the placenta and uterus, and only a small area is firmly adherent, the accreta is focal. An attempt to remove or excise the focally adherent placenta is reasonable. The attachment site can be oversewn to control bleeding, and the hemostatic square-suture technique or Bakri balloon may be helpful.


