New transobturator sling reduces risk of injury


By placing the tension-free sling between the 2 obturator foramens using a perineal approach, surgeons can eliminate complications that stem from passing needle carriers through the retropubic space. Here, 2 experts delineate this easily learned technique.
The Monarc transobturator sling (American Medical Systems), introduced in Europe in January 2003, has been used successfully in more than 1,000 procedures ( FIGURE 2). This new system offers significant technical improvements over the original transobturator sling devices.
The Monarc transobturator sling, introduced in Europe in January 2003, has been used successfully in more than 1,000 procedures.
Specifically, the Monarc system simplifies rotation of the needle passer during insertion and extraction around the inferior aspect of the ischiopubic ramus. The 3-mm–diameter passers are specifically designed for right-side or left-side use. They are attached to fixed handles to create a natural wrist rotation. The sling connectors, meanwhile, facilitate rapid, effortless, and secure mesh placement and fixation.
FIGURE 2 Monarc transobturator sling system
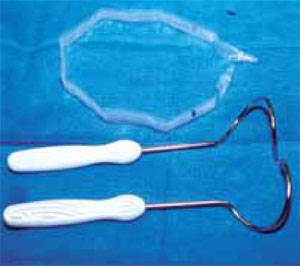
The Monarc system consists of 2 stainless steel helical-shaped needle passers and a 1-cm by 35-cm polypropylene sling mesh with a protected sheath, attached connectors, and a reabsorbable tensioning suture.
Easy to learn and perform
Anesthesia may be local, regional, or general, and prophylactic antibiotics are routinely given. FIGURES 3 through 6 offer a detailed description of how to surgically place the Monarc transobturator sling for treatment of stress urinary incontinence. What follows is a brief overview:
After making a small vertical incision along the anterior vaginal mucosa, use a finger to locate the upper-inner corner of the obturator foramen—the safe zone for needle insertion. You will incise the skin at this point and introduce the needle tip perpendicularly. Rotate the needle, with the tip following the posterior surface of the pubic ramus, until the tip exits the vaginal incision. Repeat this process on the other side.
Attach the sling and its plastic sheath, then draw both out through the skin incisions by pulling back on the needle passers. Cut the mesh, adjust the tension, and close the incisions.
A Foley catheter and vaginal packing with metronidazole gel may be used at the surgeon’s discretion.
Route minimizes anatomical hazards. The pathway described ensures that there tropubic space is not entered and that muscle or fascia are the only anatomic structures crossed by the needle passer and mesh. No major vessels or nerves come in contact with the sling (FIGURES 7 and 8).
Our fluoroscopic observations of the transobturator sling in cadavers show that insertion of the needle passer through the obturator foramen with exit through the vaginal incision under the mid-urethra is precise and simple (FIGURE 9).
Our comparative studies in cadavers revealed that, despite the different shape and placement, lengths for the SPARC and Monarc transobturator slings in the same cadaver are almost equivalent—ranging from 12 to 14 cm, depending on the patient’s height and weight (FIGURE 10).
The transobturator sling involves fewer potential anatomical hazards than retropubic placement.
These considerations strongly suggest that the transobturator sling offers a simpler approach with fewer potential anatomic hazards than retropubic tension-free slings.
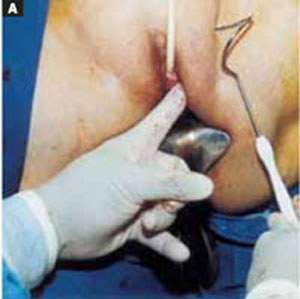
FIGURE 3 Vaginal incision
Inject a diluted vasoconstrictive solution into the anterior vaginal wall, and make a small vertical incision along the anterior vaginal mucosa 0.5 cm below the urethral meatus. Separate the vaginal epithelium from the underlying periurethral fascia using sharp and digital dissection, advancing bilaterally to the inferior pubic ramus. Insert a finger into the vaginal dissection and palpate the internal edge of the ischiopubic ramus and the upper-inner corner of the obturator foramen.
FIGURE 4 Needle entry: Transobturator sling procedure

The safe zone for needle insertion is the upper-inner corner of the obturator foramen (red line). The red dot indicates the recommended insertion site (upper inner corner).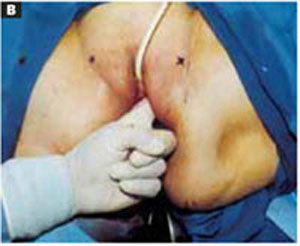
The insertion area corresponds to the point where a horizontal line at the level of the clitoris crosses a vertical line at the level of the genitofemoral fold. Make a small skin incision at this point.
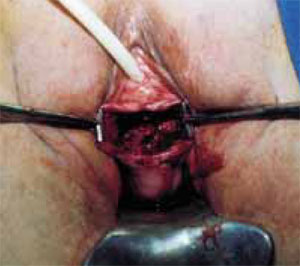
FIGURE 5 Needle passage: Transobturator sling procedure
Insert your left index finger into the vaginal incision on the patient’s left side. Holding the right-side Monarc needle, introduce the needle tip perpendicularly through the skin incision.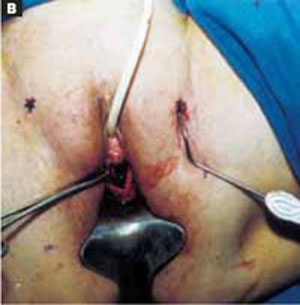
Place the thumb of your left hand onto the outside curve of the needle and gently push until its tip penetrates the obturator membrane and muscle. Use the needle’s tip to locate the pubic ramus, and rotate the needle so that the tip follows the posterior surface of this structure.
Continue this rotation, using your left index finger to guide the needle tip to exit the vaginal incision.
Repeat steps A and B on the contralateral side.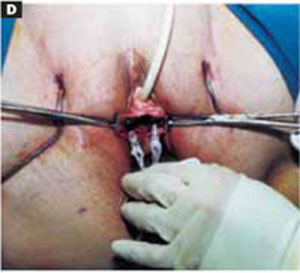
With the needle-passer tips extending out of the vaginal incision, attach the sling and its plastic sheath using the connectors. Make sure the mesh lies flat and is not twisted before attaching the connector to the second needle.