Pelosi minilaparotomy hysterectomy: Effective alternative to laparoscopy and laparotomy


This new modality—useful for normal, large, and fibroid-ridden uteri—combines the technical benefits of standard laparotomy with the convalescent advantages of laparoscopic surgery.
Incision: Modified Kustner’s. Open the abdomen with a cruciate incision. Using a conventional scalpel and the Bovie device, make a 2.5-cm to 5-cm transverse incision through the skin and subcutaneous fat until you reach the anterior rectus fascia (FIGURE 2A). Clear the fat from the midline superiorly and inferiorly to expose approximately 5 cm to 6 cm of fascia in the vertical axis. Then incise the anterior rectus fascia in a vertical direction through the full length of the cleared area (FIGURE 2B).
Retract the rectus muscles from the midline, exposing the transversalis fascia and the underlying peritoneum. Enter the peritoneum digitally or with scissors above the level of the bladder dome, incising vertically until the entrance extends the full length of the fascial incision (FIGURE 2C).
This modified Kustner’s incision is essentially a vertical midline incision in its deeper layers.1 The rapid surgical dissection of the fascia and rectus muscles and the intraperitoneal entry are relatively bloodless. This approach yields a surgical exposure superior to that of a small Pfannenstiel or Maylard incision.
Note that, in some patients, a vertical incision can be selected if there is a prior vertical incision or if the perioperative workup suggests a malignancy that may require a later extension of the original minilaparotomy incision.
Retraction: Soft, sleeve-type, self-retaining abdominal retractor. This device consists of a flexible plastic inner ring and a firmer outer ring connected by a soft plastic sleeve (FIGURE 3A). Two models are available: the Mobius (Apple Medical Corporation) and the Protractor (Weck Closure Systems, Research Triangle Park, NC).
Squeeze the inner ring into the peritoneal cavity through the minilaparotomy incision, allowing it to spring open against the parietal peritoneum. Conduct a digital assessment to ensure that no viscera are trapped by elevating the outer ring. Next, roll the outer ring onto the sleeve, collecting excess length, until it sits firmly against the skin (FIGURES 3B and 3C). The result, when there is adequate tension within the sleeve, is a circular area of retraction offering excellent exposure of the pelvis. Note that during surgery you may need to adjust the outer ring if the sleeve loosens.
The soft, self-retaining abdominal retractor offers several advantages over traditional abdominal retraction:
- Atraumatic retraction. This device distributes retraction force evenly around the entire incision. Because standard retractors concentrate retraction force at only a few points, they often lead to tissue trauma, nerve damage, bruising, and postoperative pain.
- Incision protection. The retractor’s flexible material lines the incision, protecting the wound’s edges from contamination and potential implantation of malignant cells.
- Improved access. Because the continuous retraction force is delivered more effectively to the incision, exposure is maximized. As a result, the need for intensive surgical assistance is dramatically reduced.
- Adjustable height. The retractor’s design lets it adapt to wounds of varying depth—a feature that makes it ideal for obese patients. The device compresses the patient’s skin and peritoneum between the external and internal rings, keeping the full thickness of the abdominal incision constant throughout the surgery.
- Cost-effectiveness. The device, which costs under $100, is simple and fast to set up. In our experience, placement takes approximately 2 minutes; this compares favorably with table-mounted or self-retaining rigid retraction systems, which may require significant capital expenditures (cost may run in the thousands), repair costs, and complicated set-ups.
FIGURE 1 Hinged uterine manipulator
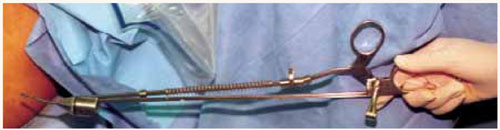
A sturdy hinged uterine manipulator facilitates exposure of the adnexa as well as elevation/rotation of the uterus.
FIGURE 2 Cruciate incision
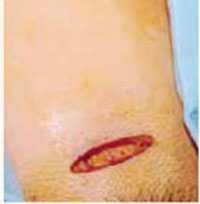
A. Make a transverse incision suprapubically through the skin and the subcutaneous fat to reach the anterior rectus fascia.
FIGURE 2 Cruciate incision
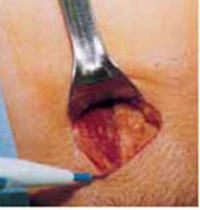
B. Clear the fat from the midline to expose the rectus fascia in the vertical axis, then incise the fascia in a vertical direction through the full length of the previously cleared area. The rectus muscles are retracted, thereby exposing the peritoneum.
FIGURE 2 Cruciate incision
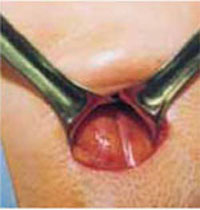
C. Incise the peritoneum vertically until it extends the full length of the fascial incision.
FIGURE 3 Soft, sleeve-type, self-retaining abdominal retractor
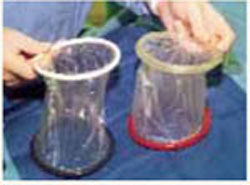
A. At left, the Protractor (Weck Closure Systems); at right, the Mobius (Apple Medical Corporation).
FIGURE 3 Soft, sleeve-type, self-retaining abdominal retractor
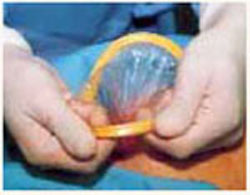
B. After inserting the inner ring into the peritoneal cavity, twist the outer ring downward until it inverts and rests snuggly against the skin.
FIGURE 3 Soft, sleeve-type, self-retaining abdominal retractor

C. An atraumatic, circular, self-retaining area of retraction is created.
Standard technique: Exteriorize the uterus; divide uterine attachments, vessels
Assess the anatomy. Using your index finger and the uterine manipulator to rotate and flex the uterus, carefully assess the uterus, adnexa, and pelvis, noting the location of the ureters. Determine the extent of any unexpected pelvic pathology or adhesions, using traditional small retractors or gentle packing to gain additional exposure. Perform any adhesiolysis that is necessary.