
Optimal surgical management of stage 3 and 4 pelvic organ prolapse


What the evidence and the experts say about the various approaches for prolapse repair
Abdominal sacrocolpopexy: A tried-and-true approach for apical prolapse repair
Sarah Huber, MD, and Patrick Culligan, MD
Dr. Culligan reports that he is a shareholder in Oragami Surgical LLC and a consultant and speaker for Coloplast and Intuitive Surgical Inc. Dr. Huber reports no financial relationships relevant to this article.
CASE Woman with advanced prolapse desires surgical repair
A 55-year-old woman (G2P2) presents to her gynecologist's office reporting a vaginal bulge and pressure that has been worsening for the past year. She describes a nontender ball of tissue the size of an orange protruding past the introitus that worsens with ambulating and lifting heavy objects. She reports some urinary urgency and increased frequency and at times feels as though her bladder does not empty completely with voiding. She denies any urinary incontinence. The patient has regular bowel movements but does report some difficulty with stool evacuation. She has a history of 2 vaginal deliveries and is sexually active. She is postmenopausal, with the last menses about 4 years ago. She is active and exercises regularly.
The patient's Pap smears, mammograms, and colonoscopy are up to date and test results have been normal. She has no significant medical or surgical history and no significant family history of cancer. On examination, her body mass index is normal, as is the cardiopulmonary exam. Her pelvic organ prolapse quantification system (POP-Q) score is Aa +3, Ba +3, C +4, GH 3, PB 3, TVL 10, Ap +2, Bp +2, and D +2. The patient is interested in surgical management.
What urodynamic tests would be appropriate for this patient, and what treatment options would you recommend?
- Robot-assisted laparoscopic sacrocolpopexy is a safe, effective, and durable treatment for advanced-stage pelvic organ prolapse.
- This procedure can completely correct stage 3 or 4 prolapse when the dissection of the anterior vaginal wall extends to the bladder neck and the dissection of the posterior vaginal wall extends to the perineal body.
- One can avoid the need for concomitant vaginal prolapse repair by gathering up stretched out vaginal epithelium while suturing to the mesh arms.
- Sacral attachment sutures should be placed in the anterior longitudinal ligament distal to the sacral promontory to avoid the L5-S1 disc.
- Unless contraindicated, lightweight macroporous polypropylene mesh is the current implant of choice.
Additional tests needed
Patients with advanced-stage pelvic organ prolapse are at an increased risk for stress urinary incontinence that may be masked by urethral "kinking" due to anatomic distortion of the periurethral support mechanism. Based on recommendations from the American Urological Association (AUA) and Society of Urodynamics, Female Pelvic Medicine and Urogenital Reconstruction (SUFU), we routinely perform a postvoid residual urine volume measurement, urinalysis, urine culture, and a prolapse reduction stress test.24 If the urinalysis is positive for blood, then a preoperative cystoscopy would be indicated.
If stress incontinence is confirmed by reduction stress testing, the patient should be offered an anti-incontinence procedure, such as a mesh midurethral sling.
This patient's overactive bladder symptoms warrant investigation via complex urodynamic testing to allow for comprehensive counseling about her postoperative expectations.
Counseling the patient on the sacrocolpopexy option
Abdominal sacrocolpopexy initially was described in 1962 by Lane as a technique to affix the vaginal apex to the sacral promontory using a graft. Although the procedure has been modified over the years, the principles of using an implanted strengthening material to permanently attach the apex to the anterior longitudinal ligament at the sacrum has proven to be a highly effective and safe treatment, establishing it as the gold standard for apical prolapse repair.25,26
Compared with other methods of apical prolapse repair, sacrocolpopexy via any approach is superior to vaginal surgery in terms of subjective and objective outcomes. In a recent systematic review comparing apical prolapse repairs, patients who underwent a vaginal approach were more likely to report awareness of their prolapse after surgery, undergo repeat surgery, have objective recurrent prolapse, and were at increased risk for postoperative stress urinary incontinence and dyspareunia.26 Prospective studies within our practice have shown 1-year composite subjective and objective cure rates of 94% to 95%.27,28
Selecting a route for sacrocolpopexy
Although sacrocolpopexy can be approached via laparotomy or conventional laparoscopy, we routinely use a robot-assisted approach, as it has been shown to be especially beneficial for complex situations, such as in patients with prior pelvic surgery, a foreshortened vagina, or obesity.29,30
Potential complications
Sacrocolpopexy complications are rare, especially when a minimally invasive approach is used.31 Reported complications of minimally invasive sacrocolpopexy include gastrointestinal or genitourinary injury, bowel obstruction or ileus, incisional hernia, vascular injury, discitis or osteomyelitis, conversion to open procedure, and mesh exposure.
Vaginal mesh exposure is rare following sacrocolpopexy, but it can occur at any time following surgery.31 Some risk factors include mesh material selection (specifically polytetrafluoroethylene [PTFE] mesh), concurrent total hysterectomy, vaginal atrophy, and smoking.32,33 As a result, recent recommendations have advised the use of polypropylene mesh with uterine preservation or supracervical hysterectomy at the time of sacrocolpopexy.34 In fact, supracervical hysterectomy alone appears to cut down or eliminate the risk of mesh exposure in laparoscopic sacrocolpopexy.35
In our practice, avoiding split-thickness vaginal dissection, employing supracervical hysterectomy techniques, and using ultralightweight mesh has resulted in mesh exposure rates approaching zero.28
For atrophic vaginal tissue, one can consider prescribing preoperative vaginal estrogen for 4 to 6 weeks, but this is not essential and should not routinely delay pelvic reconstructive surgery.
What type of implant material is best?
While various materials have been used as the fixation media in sacrocolpopexy, loosely knitted synthetic type I macroporous polypropylene mesh is the best choice due to its efficacy, availability, and low adverse effect profile. We recommend a lightweight mesh with a maximum weight of 25 g/m2. Two such products currently available are the UPsylon Y-Mesh (Boston Scientific, Marlborough, Massachusetts) and Restorelle Y mesh (Coloplast, Minneapolis, Minnesota). Lightweight mesh has been proven to maintain integrity, guaranteeing a successful outcome, while reducing the "mesh load" on the attached tissue.27,28
Comparative studies with fascia lata or cross-linked porcine dermal grafts demonstrated inferior outcomes versus synthetic mesh, and currently the only biologic material on the market indicated for prolapse repair augmentation, ACell Pelvic Floor Matrix (ACell, Columbia, Maryland), has not been extensively tested in sacrocolpopexy.36-38
Vaginal anatomy restored by sacrocolpopexy
Abdominal sacrocolpopexy, specifically via a minimally invasive approach, is an effective and long-lasting treatment that should be offered to women with advanced-stage prolapse.
Using the surgical techniques described below, including attachment of the mesh along the lengths of the anterior and posterior vaginal walls and gathering up excess tissue with mesh attachment, can provide women with adequate support for the entire vagina with restoration of normal vaginal anatomy and caliber.
Step-by-step tips for surgical efficiency
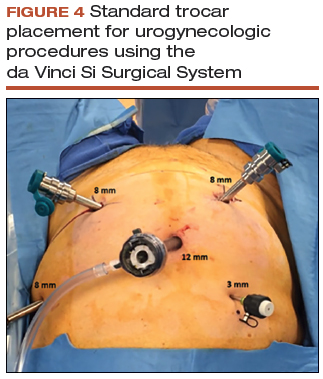
Robotic port placement
- Place the trocars in a "W" layout for the da Vinci Si Surgical System (FIGURE 4, VIDEO 1) or in a linear layout for the da Vinci Xi Surgical System (Intuitive Surgical, Sunnyvale, California). Both Si and Xi port placement includes a 3- to 5-mm assistant port in the right upper quadrant of the abdomen.
Supracervical hysterectomy, if indicated
- Maneuver the uterus with the robotic tenaculum, which obviates the need for a uterine manipulator during the hysterectomy (VIDEO 2).
- Create the bladder flap just above the upper edge of the bladder to facilitate the upcoming anterior wall dissection. This helps to prevent the development of a split-thickness dissection plane.
- 1.5 to 2 cm of cervix should be left in place, and conization should be avoided.
Anterior vaginal wall dissection
- The key to a good full-thickness dissection is sustained tissue traction and countertraction. The bedside assistant pulls the anterior peritoneal cut edge anteriorly for "gross" traction, and further "fine" traction can be created by pulling the areolar tissue with robotic forceps. The cervix is grasped with the tenaculum, which applies a constant midline cephalad countertraction (VIDEO 3).
- Sharp dissection with cold scissors allows for creation of the dissection plane, while cautery is judiciously applied only for hemostasis. If bleeding is encountered, this usually indicates that a split thickness of the vaginal wall has been created, and the surgeon should correct to the proper dissection plane.
- Dissection is made easier by taking down the bladder pillars before advancing down toward the bladder neck.
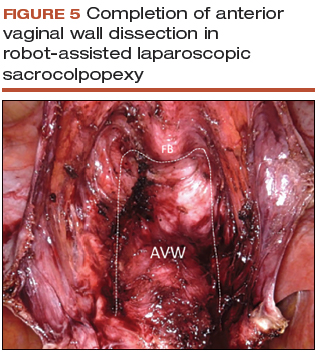
- The anterior dissection is always carried down to level of the trigone, confirmed by visualization of the Foley bulb (FIGURE 5).
Posterior vaginal wall dissection
- Begin dissection just above the rectal reflection, leaving peritoneum on the posterior cervix (VIDEO 4).
- Extend the incision bilaterally to the uterosacral ligaments only after the correct dissection plane is confirmed by visualization of the areolar tissue.
- Apply cervical traction using the tenaculum in a cephalad midline direction, and place traction on the cut edge of the posterior peritoneum using the bipolar forceps. The tenaculum wrist must be turned away from the working instruments to avoid internal clashing.
- Completely transect the right uterosacral ligament to better facilitate the creation of a contiguous peritoneal opening for burying the mesh. The remainder of the opening will be created later.
- While it is important to avoid split-thickness dissection, the vaginal plane must be "clean" (that is, without fat or adventitia) to allow for robust suturing.
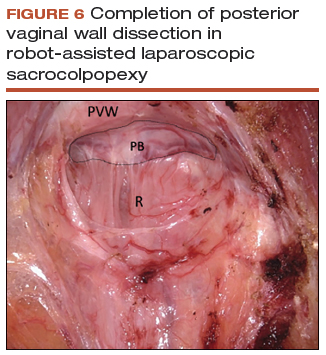
- Dissection at least halfway down the posterior vaginal wall is recommended but proceeding down to the perineal body provides the most optimal support (FIGURE 6).
Sacral dissection
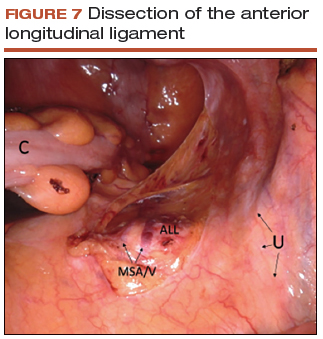
- Use a noncrushing instrument to laterally sweep the bowel to the left side, effectively "plastering" the peritoneum over the sacral promontory (FIGURE 7; VIDEO 5).
- Extend the superficial peritoneal incision down the right paracolic gutter halfway between the ureter and colon until it communicates with the incised posterior peritoneal edge created during the posterior dissection.
- Identify the middle sacral artery to avoid vascular injury, but there is no need to prophylactically coagulate it.
Vaginal mesh attachment
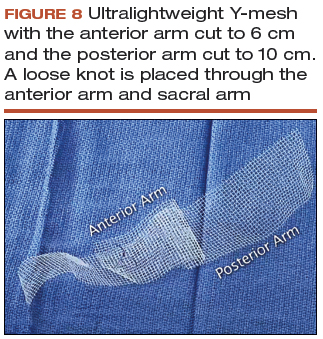
- Cut a lightweight Y-mesh to a length of 6 to 8 cm anteriorly and 8 to 11 cm posteriorly and place it into the surgical field (FIGURE 8; VIDEO 6). The length is determined based on the preoperative office examination and examination under anesthesia prior to starting the procedure.
- Attach the mesh securely and evenly to the anterior and posterior vaginal walls using multiple interrupted monofilament sutures. We aim to place sutures that provide mesh stability without excess vaginal wall incorporation to avoid "through-and-through" suturing.
- The posterior wall suturing is performed first, starting at the perineal body and continuing cephalad (VIDEO 7). We find it easiest to tie the knots between the mesh and the vagina in this space.
- Suture the crotch of the Y-mesh to the cervix so that no gap exists between tissue and mesh.
- For advanced-stage prolapse with significant anterior prolapse, the stretched out vaginal epithelium can be systematically gathered up to reconfigure the tissue to conform to the desired mesh dimensions (VIDEO 8). This tissue remodeling is evident even at the 2- to 4-week postoperative visit.
Peritoneal closure: Step 1
- Reapproximate the cut edges of peritoneum surrounding the vagina and cervix using a continuous purse-string suture of 0 Monocryl (poliglecaprone 25) on an SH needle (Ethicon, Somerville, New Jersey) with a fisherman's knot tied at the end (VIDEO 9). The needle passes are placed close together and close to the incised edge of the cut peritoneum.
- We typically start our peritoneal suture at the 5 o'clock position of the posterior peritoneum, extending in a clockwise direction and ultimately jumping anteriorly around the sacral arm of the mesh.
- Place the mesh within the paracolic peritoneal canal, and secure the needle for later use.
Sacral mesh attachment
- The mesh is tensioned so that a vaginal examination confirms adequate support of all the walls without excess tension or tissue banding. Some laxity of the anterior vaginal wall consistent with a mild cystocele is appropriate.
- Place 2 permanent PTFE sutures along the slope of the sacral promontory into the anterior longitudinal ligament (VIDEO 10). This avoids injury to the disc space that sits at the edge of the promontory. We do not advise the use of bone anchors as they increase the risk for discitis and osteomyelitis.
- Secure the mesh to the anterior longitudinal ligament without any tension. This is facilitated by creating mesh slack via cephalad pressure from a vaginal probe.
Peritoneal closure: Step 2
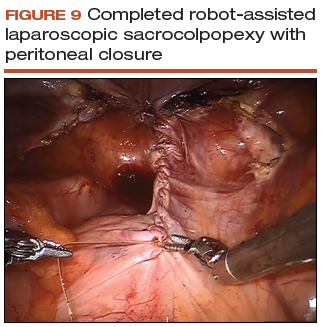
- Close the remaining paracolic peritoneal incision, completely burying the mesh within the created canal (FIGURE 9).
- At the end of the procedure, perform a repeat vaginal exam, rectal exam, and cystoscopy.
Technique with prior total hysterectomy
- In patients with a prior total hysterectomy, place a 13 x 3.5 cm Breisky vaginal retractor and/or coated nonconductive stent (Marina Medical, Sunrise, Florida) into the vagina to delineate the anterior and posterior walls at the vaginal apex during dissection.
- Some surgeons may opt to retrograde fill the bladder to better identify its location.
- We routinely leave a segment of peritoneum attached to the dome of the vaginal apex for added tissue integrity to prevent erosion.
