Managing complications at the time of vaginal hysterectomy


Proper technique for preserving ureteral integrity, repairing cystotomy, ensuring hemostasis, and reducing uterine size for transvaginal removal can help the surgeon avoid pitfalls during vaginal surgery
In this Article
- Ensuring ureter protection
- Cystotomy repair
- Bleeding control strategies
This article is based on the AAGL-produced and ACOG/SGS cosponsored Online Master Class on Vaginal Hysterectomy
Next, stop and apply traction to the repair to check for any small defects that may have been overlooked. By placing a little traction on that first suture tag, any such defects will become apparent. Then go back and close them in a secondary imbricating layer.
After 2-layer closure, fill the bladder retrograde. I prefer to use a couple of drops of methylene blue in normal saline and place a clean white piece of packing material beneath the wound. If the packing material remains unstained by blue, the repair is watertight.
Incorporate the peritoneum as another layer of repair of the defect. I imbricate 2 layers in the bladder. Then, if necessary, I use that peritoneum as an additional layer (FIGURE 4).

Strategies to control bleeding at adnexectomy
Be vigilant for bleeding when removing the tubes and/or ovaries. At salpingectomy, be extremely gentle with the mesosalpinx because it can be avulsed easily off of surrounding tissue. If bleeding occurs, oversewing, or even ovary removal, could end up being the only options.
Good visualization is essential during vaginal procedures. Retractors, lighted suction irrigators, a headlamp, good overhead lighting, and appropriate instrumentation are critical for success.
Heaney clamp technique for vaginal oophorectomy
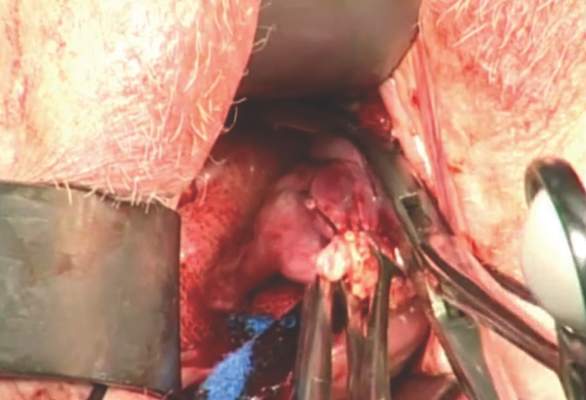
Begin by placing an Allis clamp on the utero-ovarian pedicle. Then clamp the ovary and tube with a second Allis clamp. Next, insert a Heaney clamp through the small window between the cardinal pedicle and the utero-ovarian pedicle (FIGURE 5). Clamp the tissue and place a free tie around it.
Because this is a major vascular pedicle, doubly ligate it. As you tie the first suture, have an assistant flash the clamp open and closed, then excise the specimen. There is no need to worry about losing the pedicle because it already has been ligated once. Next, stick-tie it, placing the needle distal to the free tie to avoid piercing the gonadal vessels beyond.
The technique is standard. Be gentle, and ensure good hemostasis when finished.
Tip. In my experience, any bleeding runs down from the pedicle rather than out toward me. So be sure to look down and below the pedicle to ensure hemostasis.
Additional pearls
- When performing vaginal hysterectomy, the ovaries are almost always removable transvaginally. There is no need to begin the case laparoscopically to remove the tubes and/or ovaries and then perform the hysterectomy vaginally.
- Deaver retractors offer good exposure; visualization is critical.
- Make sure the tissue is dry before you cut the last suture.
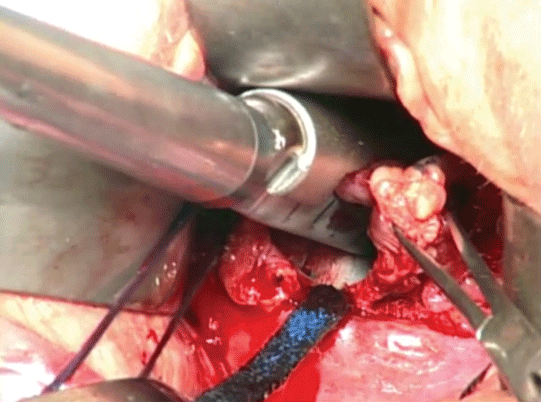
- If you prefer to use a laparoscopic stapler to secure the pedicles, proceed as before: Place an Allis clamp on the pedicle. Place a second clamp on the ovary and tube. Now you can insert the stapler into the created window, as with the Heaney clamp (FIGURE 6).
- Use a 60-mm stapler to cut the pedicle in one try. If using a 45-mm device, the stapler may need to be fired twice. This makes the procedure more expensive and risks more bleeding.
- When closing the stapler jaws, avoid clamping small bowel or packing material. Ensure stapler tip visibility well before firing.
The round ligament technique
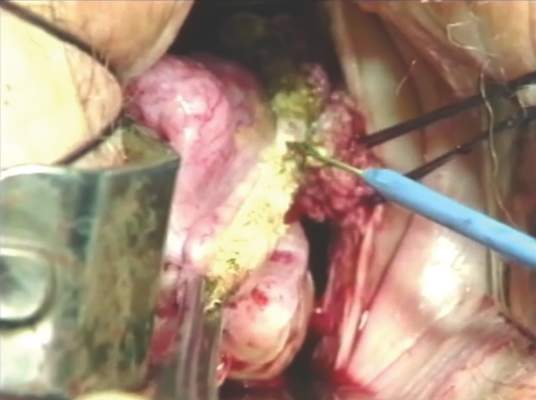
When transecting the round ligament, it is critical to stay just beneath it to avoid bleeding and venturing into the mesosalpinx. Gently hug the tissue inferior to the round ligament and let it retract (FIGURE 7). This will allow isolation of the gonadal vessels nicely, especially if an adnexal mass is present. Then isolate the specimen and remove it, stick-tying the pedicle afterward to secure it.
When tying the pedicle, place the suture around the distal aspect to ensure that the back of the pedicle is enclosed, and do not lose it when you release the clamp. A slightly different technique is to use an endoloop to cross the gonadal vessels and control them. Use a suction irrigator and good lighting to get good exposure.
Next, place the clamp, making sure you don’t inadvertently grasp the packing material. Visualize both tips of the clamp before incising. Trim the specimen flush with the clamp. Then you can thread an endoloop over the top of the clamp. This is an inexpensive technique that allows a higher reach into the pelvic cavity. Finally, cinch down the endoloop to control the vessels.