
Complex Ankle and Hindfoot Arthrodesis Using Circular External Fixation


TAKE-HOME POINTS
- Ankle and hindfoot fusion using circular external fixation is a useful surgical technique in patients with diabetes, Charcot, osteomyelitis, deformity, and/or bone and soft tissue compromise in order to obtain solid bony fusion, stable limb alignment, and eradication of infection in cases of complex pathology.
- Deformity correction with osteotomies and meticulous joint preparation is required in order to obtain broad, cancellous bony surfaces for fusion with neutral alignment. Autograft from the distal fibula and/or medial malleolus can be combined with bone allograft to assist with joint fusion.
- The ankle and hindfoot are provisionally pinned into neutral coronal and sagittal alignment through the plantar surface of the foot using large K-wires prior to placement of the lower leg in the center of a circular 3-ring compression frame. Typically, 2 to 3 points of fixation are used per ring with a combination of half-pins and smooth wires.
- Ring attachments are built up or down to the level of the half-pins and wires in order to prevent pins and wires from bending, breaking, or causing iatrogenic deformity during tensioning. Crossing olive wires are used in the midfoot and calcaneus with dual tensioning devices to ensure an even pull on both sides of the foot.
- Dynamic or static compression struts are used to obtain 8 to 10 mm of compression across the ankle and hindfoot, followed by addition of an anterior foot ring to increase construct rigidity. Daily pin care is started 3 to 4 days after surgery and patients are kept non-weight-bearing for approximately 2 months in the frame with a total frame period of 3 to 8 months depending on bony healing on X-ray.
TIBIA RING FIXATION
Tibia rings can be fixed using 2 to 3 half-pins (4-6 mm) alone or 2 half-pins in combination with a smooth wire. A small incision is made over the area of planned half-pin insertion, and the periosteum is cleared away using a hemostat. An adaptor sleeve is used, and the bone is drilled bicortically, followed by insertion of the half-pin. Hydroxyapatite-coated pins are used to improve the strength of the bone-pin interface and reduce the incidence of pin tract infections. Pins are inserted along both the anterior and medial aspects of the tibia, avoiding the thick lateral musculature. Care is taken to protect the medial neurovascular structures during pin placement following established Ilizarov safe zones.
After each pin is placed in the bone, the pin is secured to the adaptor that is then tightened to the ring. This process is repeated for both the proximal and distal tibia rings. Pins should be placed above and below each ring to avoid creating stress risers. During smooth wire placement, each wire is pushed by hand through the soft tissues and then drilled into the bone while the exposed segment is held with a damp sponge to reduce the incidence of thermal bone necrosis. Once the wire is drilled bicortically, a mallet is used to tap the wire through the remaining soft tissues to avoid wrapping them up in the wire. Each wire should be parallel to the ring to get an even line of compression.
Each wire is secured on 1 end and then tensioned to 130 kg using a hand tensioner. An additional tool can be placed in the wire adaptor to prevent the wire from bending during tensioning. If the wire is passing above or below the ring, longer wire adaptors should be used to build to the wire. The wire should never be bent toward the ring as this can increase the likelihood of improper pin tensioning and breakage. Wire placement should be avoided posteriorly as this can make it difficult to secure and/or tension wires, and also increases the risk of damage to posterior structures.
Ring fixation in the distal tibia near the plafond may require 1 half-pin and 2 wires to avoid damage to the tibialis anterior and posterior tibial tendons. In this case, smooth wires should be placed in a crossing pattern and tensioned simultaneously to avoid pulling the ankle away from the center of the frame. Wires should be bent and curved over each ring and then cut to facilitate subsequent removal.
FOOT RING FIXATION
In the foot, olive wires are used to increase fixation against bone. For each olive wire, a small incision is made to accommodate the diameter of the olive through the soft tissue. Similar to the distal tibia, 2 olive wires should be placed above and below the foot ring in a crossing pattern through the calcaneus (Figures 5A-5F). The axial view of the frame should be checked to ensure proper wire orientation. When using olive wires, it is essential to tension both at the same time to 90 kg, as the foot can be pulled medially or laterally in the frame if 1 wire is tensioned before the other.
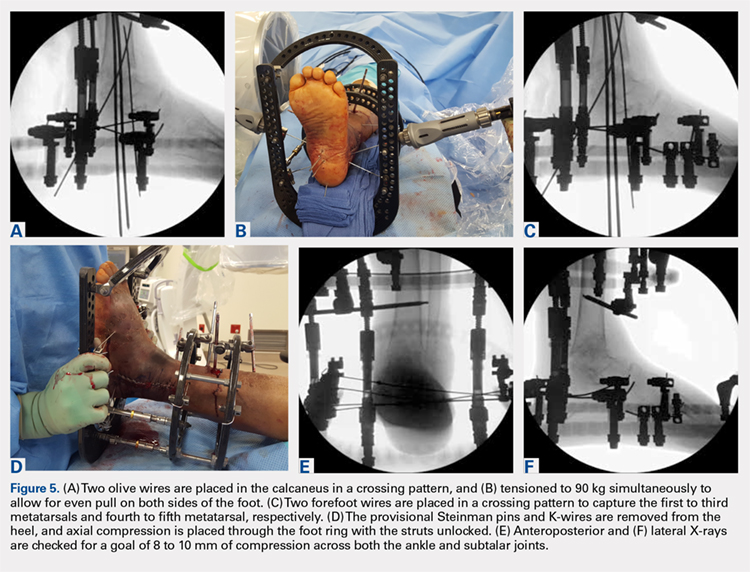
Forefoot olive wires should also be placed in a crossing pattern, with 1 wire fixed through the first, second, and third metatarsals, and 1 wire through the fourth and fifth metatarsals. Additional forefoot olive wires can be placed if compression is needed across the midfoot or Chopart joints for fusion. Multiple X-rays should be checked to ensure that the calcaneus and forefoot olive wires are firmly fixed both in and against bone.
Continue to: JOINT COMPRESSION AND FINAL FRAME ADJUSTMENTS...

